Tips and tricks.
For further information on how to handle this aircraft, refer to
my FS site.
This is a short guide to get airborne without using the whole expanded checklist.
Besides, I will give you some hints, that will be useful. After some time behind
the controls of a DC9, we did not use any tables to find different settings. Everything
can be found, using the available instruments.
When entering the aircraft, left side panel will load.
 1. Open the overhead panel and switch on the "Battery". This will get most
of the instruments alive.
1. Open the overhead panel and switch on the "Battery". This will get most
of the instruments alive.
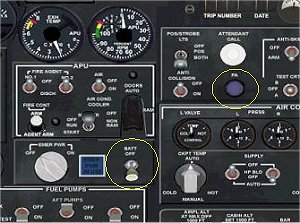
2. If you want to use "External PWR", press the PA button. The external pwr will now
be available, but not yet loaded.
 3. Move back to left panel and use the "FD switch" to move over to the right side. This
will ensure that both panels are loaded into the memory, before any settings on
the overhead.
3. Move back to left panel and use the "FD switch" to move over to the right side. This
will ensure that both panels are loaded into the memory, before any settings on
the overhead.
4. Switch on the engine driven hydraulic pumps (two pumps in the middle of the
hydraulic panel.
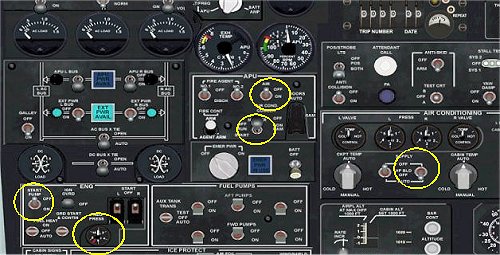
5. Open the "pedestal" and switch on the "rudder hydraulic pwr" (position ON in
this picture), set the cabin
lever in "auto" (as shown) and open the "pneumatic crossfeed" (set to closed in
this picture). Closed is the default position of the crossfeed levers, only
set to open on ground and in the air when using "airfoil anti ice".
6. Back to the overhead.
Shown in yellow markings are switches that need to be set to ON. This is the
"minimum" in order to extinguish the warning lights on the annunciator. There
are a lot more on this panel if you follow the normal checklist.
 7. Start the APU.
If you are on external pwr, you can click th APU start switch (the main fuel
pumps can be used to support the APU). If you have only battery pwr you have to
switch on the "electrical start pump" (the main pumps should NOT be used when
staring the APU on batt only, the batt voltage might be to low). When the APU
is running, switch on the APU air and you will see the pressure in the pneumatic
duct. In case you want some air in the passenger cabin, switch on the right air
condition (the pressure in the duct will drop).
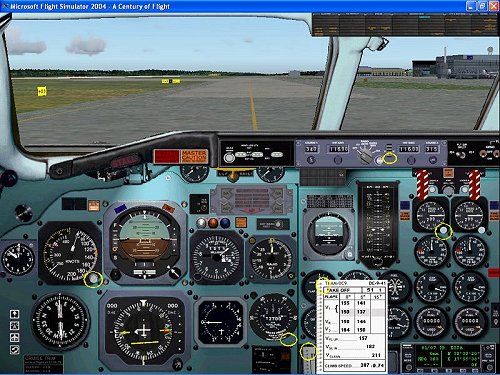
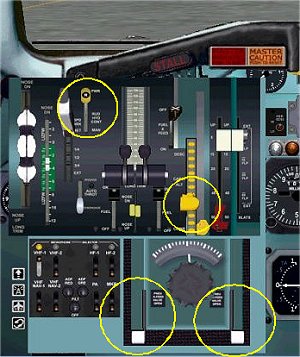
8. Back to the left main panel.
Click in the lower right part of the fuel totalizer and you will see some
hidden numbers. This is your "zero fuel weight". You can change it. Then click
the upper left corner of the seedbook and it will show the takeoff page with the
correct weight (zero fuel weight + actual fuel). When the speedbook is open, it
is possible to get the landing page by clicking the upper left corner.Set the V2
on the IAS indicator. Move the FD button on the "nav controller" to "full up".
Set the takeoff EPR.
Normal 2.55, derated 2.015.
For the DC9-21 the values are: 2.007 and 1.967
9. Engine start.
To start the engines you need:
- 1. APU running and APU AIR - ON.
- 2. Ignition - GRND START.
- 3. Fuel pumps - ON.
- 4. AIR COND - OFF
- You must have minimum 36PSI on the pressure gauge located on the
engine starter panel.
- 5. Pneumatic crossfeed - OPEN.
- Located at the aft of the throttle consol.
Now it is time to click on the engine starter switch to open the cover and
the click once more on the switch (right engine is always the first one). You
will see N2 rising and when 20% move the fuel shutoff valve to - ON. The engine
will fire up and you will hear the sound indicating that the generator is
online.
10. Power settings.
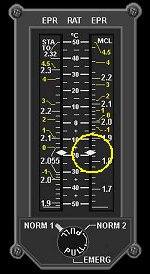
For takeoff EPR - set the bugs in the EPR instruments to takeoff value.
For climb thrust (set at 1500 ft and during the rest of the climb) use the
right scale in the EPR/RAT. The white dot will move along the scale and
show correct climb thrust. You will have to adjust the throttles somewhat
during the climb.
For cruise setting you can find the approximate EPR from the readings
of the Metric Altimeter (exact information is found on the instrument
part of my site).
For descend the initial EPR setting giving 1000ft/min is approximately
0.25 below cruise.
Click in the middle of the instrument to get a better view. Unfortunately,
this does not work in the -21 (use SHIFT 5 instead).
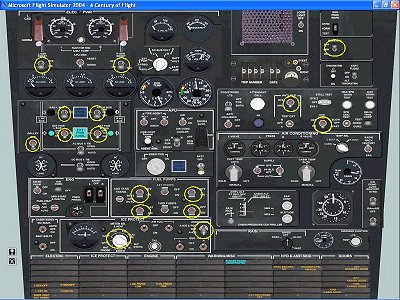
Use of mouse buttons.
There are some areas where you may use the right mouse button and also some "hidden"
click areas in this panel.
Annunciator.
This is the overhead annunciator at takeoff - only one blue light (will go
off at approx 150knots) there might be more blue lights with anti-ice on.
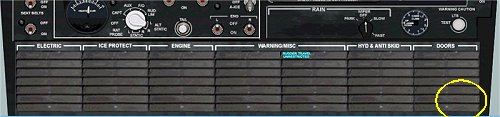
In the lower right corner of the annunciator is a click spot to open the doors.
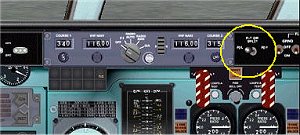
Nav controller.
To set the course on VOR NAVI/II use the right button to set in increments of
10. The left button will set increments of one degree.
The same thing is valid for the "Heading select knob".
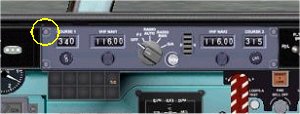
Click the upper left corner of the Navcontroller to set TOGA. The switch will
flip to GA position.
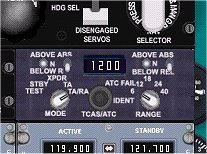
APS.
Use the left mouse button to set increments in 1000ft and the right button to set
100ft. OBS before setting anything, you must click on top of the ALT setting knob
in order to reset the system.

TCAS.
The left mouse button will move the knobs to the left and the right button will
move them to the right.
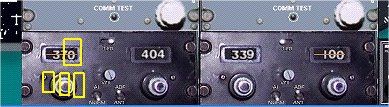
ADF.
There are one mouse area for every digit in the ADF frequency window. To set
the last digit into "half" click on top of the digit ie. to set 370.5.
SOP Standard operating Procedures.
Refer to the panel checklist for further info.
At the gate, engines are off.
- Setting of nav aids.
- HEADING BUG to initial heading.
- APS on initial altitude/FL.
- VOR1 to outbound nav aid.
- VOR2 to DME.
- NDB.
- VHF RADIO.
- TRANSPONDER.
- Set speed bug on the airspeed indicator to V2.
- Set the take off EPR.
- Set actual QNH on the altimeter.
- Check that index on the radio altimeter is set to zero.
- Trim the horizontal Flight Director bar fully up. This is the normal position
during flight.
Push back and start up.
The engines are normally started during the push back. When using FPDA panel for your
push back, start the engines after push back and brakes set.
- 1.Click the right engine starter switch and check N2 to be approximately 20%.
- Then move the fuel shut off to on.
- 2.The same procedure for the left engine.
-
- 3.Before taxi - set nose light and ground flood lights to on.
- You may also set the ENG/NACELLE lights to ON.
- 4.Flaps 15.
- 5.Flight Director to F/I.
Taxi.
- 1.One minute before take off - seat belt sight ON/OFF. This is to warn your cabin
crew, that take off is imminent.
- 2.Set flaps for take off. normally flaps 5 on the -41. Use flaps 15 on short
and/or slippery runways. OBS the -21 is certified for flaps 15 only.
- 3.Set Flight Director in GA (Go Around).
Take off and climb out.
During take off - if anything happens before V1 is called - ABORT.
- The altitude light on the BOW TIE will come on during acceleration - this is normal.
- At rotate - lift the nose (approximately 6 seconds to 20 ° nose up).
- Retract the gear and climb with speed V2 + 10kt but not more than 20 ° nose up.
- At 1500 ft - climb thrust.
- At 3000 ft lower the nose to 1000ft/min in climb and retract the flaps and slats.
Now it is normally time to engage the autopilot.
- Click the A/P engage lever.
- Set heading switch to on.
- Set APS to auto.
- Adjust rate of climb.
- Set Flight Director ti FI (Flight Instruments).
- At speed 250kt, lift the nose to approximately 2 500ft/min climb and set IAS HOLD.
- Time to set FASTEN SEAT BELT to off.
- Set the bug on the Radio altimeter to max. This is to get a warning, when descending
close to the ground.
- At FL100 set PITCH SELECTOR to vertical speed again and set 1000ft/min in climb.
Accelerate to your climb speed (normally 3000kt). Lift the nose and set IAS HOLD.
- 1 000ft before your selected altitude - set vertical speed to 1000ft/min. The APS
will capture the altitude and the A/P will level off.
Cruise.
Normal speed during cruise; 300kt indicated or M.74 up to FL290 and M.76 above.
Use A/P in heading select. Of course NAV LOC can be used, but that is not very common.
Prepare for descent:
- 1.Set Seed bug on the airspeed indicator to Vth (Threshold speed). I am using
130kt.
- 2.Set FL or altitude on the APS.
- 3.Set the APS to AUTO.
Descent.
Keep cruise speed/300kt above FL100 during descent.
Descent with 1000ft/min down to FL250 and then idle thrust.
Start of descent:
Lower the nose by the Vert speed wheel, and reduce thrust. When reaching FL250 set vertical
speed to approximately 2 500 - 3 000 ft/min and reduce to idle thrust. When stabilized set
IAS HOLD.
At FL150 it is time to FASTEN SEAT BELT again.
At FL110 set vertical speed to not more than 1000ft/min, and the speed will drop. At speed 250kt
lower the nose and select IAS HOLD again.
Approach.
- The Autopilot may be used down to 50ft Radio Height on an ILS approach otherwise
300ft.
- When passing 2000ft the DH light on the Horizon will start flashing. Reset the RA
bug to 1100ft.
- When leaving the initial approach altitude (normally 2500ft), set the APS to go
around altitude.
- After gear down - arm the auto spoiler.
- The altitude light will come on flashing, when passing 700ft from the go around
altitude. Press the light and it will come on steady.
- When the DH start flashing - check that you are stabilized on the approach and set
the bug below zero.
If cleared for the ILS approach:
- Set NAV SELECTOR to ILS.
- Set Flight Director to RADIO AUTO.
The A/P and FD will capture and follow the ILS Localizer and Glide path.
If cleared for Localizer or VOR approach:
- Set NAV SELECTOR to NAV LOC.
- Set Flight Director to RADIO AUTO.
The A/P and FD will capture and follow the Localizer/VOR. Use Vertical speed to descent on
the final. Approximate vertical speed 700 - 1 000ft/min depending on wind and speed.
If cleared for NDB approach:
Use HEADING SELECT and VERTICAL SPEED wheel.
The A/P will not be able to track an NDB automatically.
Landing.
-
- After touch down - reverse thrust no brakes.
- At 80kt - un-reverse and start to wheel brake.
- At taxi speed - set flaps 15.
- Retract spoilers.
- Landing lights - OFF.
Taxi to the gate.
- Set Flight director to OFF.
When turning in to the gate:
- Flaps up.
- Taxi lights and ground flood lights OFF.
When at the gate:
|